Posted 13 years ago
·
Author
- Files:
Google Sketchup 13 Pro: Download
Google Sketchup Meshout Plugin: Download
Mirror:https://www.imvumafias.org/community/viewtopic.php?f=77&t=7844
- Making a simple item ready to export:
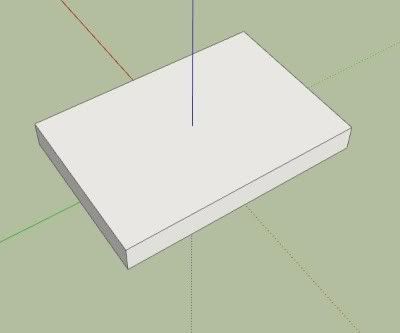
After installing MeshOut (read its readme's) open SketchUp and make a simple box and then make it 3D essentially making a door mat. This will do as a simple example, larger objects export in the same way.
- Texturing:
Ok adding color! Click the Paint Bucket tool and pick a texture (not a block color) from the floating Materials box that appears and paint the top and then pick another texture to paint the rest.
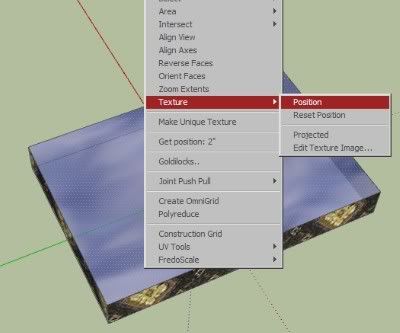
Pinning! Now to adjust a texture we can right click the texture and highlight Texture and then click Position as shown in the below image. (I have many extra's installed so my right click menu will look different to yours)
Now you may need to zoom out to see your applied texture fully. You should see your texture tiled all over with 4 pins, they Should be at the 4 edges of 1 tile of your texture. The red one moves the entire texture, the green one scales the texture making it all bigger or smaller and the blue one stretches your texture up and down from the red pin, the yellow pin warps the texture, since as of writing this non of the 3 exporters can export warped textures we stay away from this pin unless we need to straiten up the texture to make it square / rectangle again. These can be moved about if needed by single clicking them and putting them back but we shouldn't need to do that right now.
Ok now drag the red pin to 1 corner of your door mat so it moves the entire texture. Now drag the green pin to another corner opposite it. Now finally drag the blue pin to the other corner opposite the red and this should now have stretched your chosen texture to the 4 corners of your mat!
- Exporting Time!
Ok now save your mesh and give it a nice simple name you will remember, its a good idea to save it in its own folder as what happens next will make lots of other files and its a good idea to keep them all separate from other things as not to loose them.
Alright now we find out if you followed the instructions in the readme correct to install MeshOut.
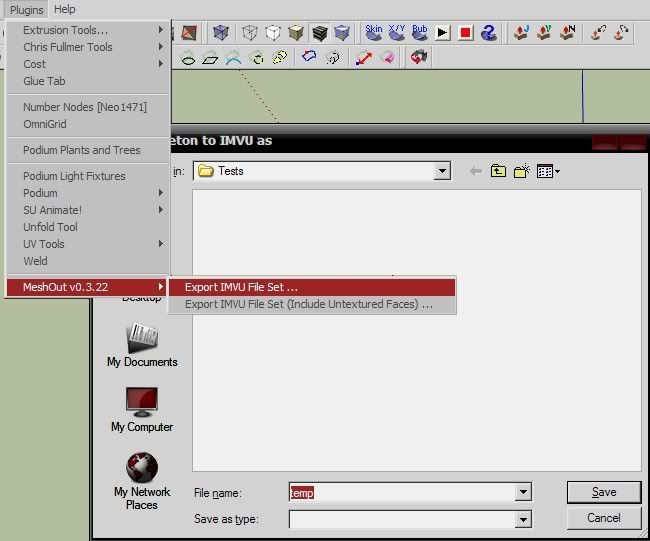
Now click Plugins --> MeshOut v0.3.22 --> Export IMVU File Set...
This will bring up a box named Export skeleton to IMVU as, Just click save as navigating away from that point doesn't work, it just saves everything there anyway (hey its a working test version!)
It will now freeze a moment, on larger mesh's this will be noticeable.
You will now see a popup box that reads Export Complete and at the bottom left of your screen it will give a little info, such as time taken and the number of polygons your mesh use's.
Anything above 25k polygons and this exporter grinds to a halt.
- Create Mode!
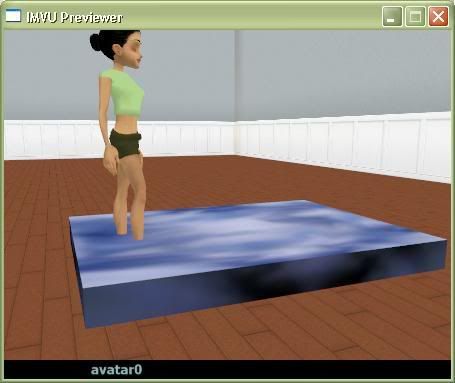
Finally! time to load up the Create Mode and import your mesh into IMVU!
1. Open IMVU and go into Create Mode
2. Click "Derive New Product"
3. Click the "Rooms & Furniture" Tab
This is just for this tutorial, if you were making something besides a furniture product such as a room or clothing, you would select a different tab.
4. Click "Furniture" NOT "furniture (wall)"
Again, this is just for this tutorial, if you were making something that goes on the wall then you would select the wall option or room if you were making a room.
This should now load up an IMVU chair
5. Click the meshes tab
6. Click the "Add .xmf button"
7. Navigate to wherever you exported your mesh to and select it.
8. Click apply above the meshes tab
This should have loaded your mesh either with the chair textures or plain white.
9. Click the config tab
10. Click the "Add .XSF" button.
11. Select your XSF file
12. Click apply
This will load up your nodes and move your mesh into it's proper location. If you had sitting notes or furniture nodes, this is where they would be added.
13. Go back to the meshes tab
14. Look down at the materials
This is where you'll apply the textures to your mesh. Depending on how many textures you applied to your mesh before exporting, your materials menu could contain 1 or 100 materials.
15. Click on each material box (00,01,02 etc..) and then click the edit button on the right of it.
This will open up the dialog box where you select your texture.
For this part, you can either guess which material belongs to which texture in Sketchup or before you export your mesh, you can give your textures unique names and then look at your "YOURMESHNAME.report.txt" file. This will tell you what each material is assigned to.
Once you are done applying all your textures, you are pretty much finished. You can look at your mesh and decide if it's ready to submit or not. Now this was a basic tutorial, more complicated products will require multiple exports and lots of trial and error usually to get everything just the way you want it. BUt hopefully this tutorial will give you an idea on how to export your mesh and get it into IMVU.
**Note: This tutorial was copied from Neo1471 but edited & added to by me.**
Google Sketchup 13 Pro: Download
Google Sketchup Meshout Plugin: Download
Mirror:https://www.imvumafias.org/community/viewtopic.php?f=77&t=7844
- Making a simple item ready to export:
After installing MeshOut (read its readme's) open SketchUp and make a simple box and then make it 3D essentially making a door mat. This will do as a simple example, larger objects export in the same way.
- Texturing:
Ok adding color! Click the Paint Bucket tool and pick a texture (not a block color) from the floating Materials box that appears and paint the top and then pick another texture to paint the rest.
Pinning! Now to adjust a texture we can right click the texture and highlight Texture and then click Position as shown in the below image. (I have many extra's installed so my right click menu will look different to yours)
Now you may need to zoom out to see your applied texture fully. You should see your texture tiled all over with 4 pins, they Should be at the 4 edges of 1 tile of your texture. The red one moves the entire texture, the green one scales the texture making it all bigger or smaller and the blue one stretches your texture up and down from the red pin, the yellow pin warps the texture, since as of writing this non of the 3 exporters can export warped textures we stay away from this pin unless we need to straiten up the texture to make it square / rectangle again. These can be moved about if needed by single clicking them and putting them back but we shouldn't need to do that right now.
Ok now drag the red pin to 1 corner of your door mat so it moves the entire texture. Now drag the green pin to another corner opposite it. Now finally drag the blue pin to the other corner opposite the red and this should now have stretched your chosen texture to the 4 corners of your mat!
- Exporting Time!
Ok now save your mesh and give it a nice simple name you will remember, its a good idea to save it in its own folder as what happens next will make lots of other files and its a good idea to keep them all separate from other things as not to loose them.
Alright now we find out if you followed the instructions in the readme correct to install MeshOut.
Now click Plugins --> MeshOut v0.3.22 --> Export IMVU File Set...
This will bring up a box named Export skeleton to IMVU as, Just click save as navigating away from that point doesn't work, it just saves everything there anyway (hey its a working test version!)
It will now freeze a moment, on larger mesh's this will be noticeable.
You will now see a popup box that reads Export Complete and at the bottom left of your screen it will give a little info, such as time taken and the number of polygons your mesh use's.
Anything above 25k polygons and this exporter grinds to a halt.
- Create Mode!
Finally! time to load up the Create Mode and import your mesh into IMVU!
1. Open IMVU and go into Create Mode
2. Click "Derive New Product"
3. Click the "Rooms & Furniture" Tab
This is just for this tutorial, if you were making something besides a furniture product such as a room or clothing, you would select a different tab.
4. Click "Furniture" NOT "furniture (wall)"
Again, this is just for this tutorial, if you were making something that goes on the wall then you would select the wall option or room if you were making a room.
This should now load up an IMVU chair
5. Click the meshes tab
6. Click the "Add .xmf button"
7. Navigate to wherever you exported your mesh to and select it.
8. Click apply above the meshes tab
This should have loaded your mesh either with the chair textures or plain white.
9. Click the config tab
10. Click the "Add .XSF" button.
11. Select your XSF file
12. Click apply
This will load up your nodes and move your mesh into it's proper location. If you had sitting notes or furniture nodes, this is where they would be added.
13. Go back to the meshes tab
14. Look down at the materials
This is where you'll apply the textures to your mesh. Depending on how many textures you applied to your mesh before exporting, your materials menu could contain 1 or 100 materials.
15. Click on each material box (00,01,02 etc..) and then click the edit button on the right of it.
This will open up the dialog box where you select your texture.
For this part, you can either guess which material belongs to which texture in Sketchup or before you export your mesh, you can give your textures unique names and then look at your "YOURMESHNAME.report.txt" file. This will tell you what each material is assigned to.
Once you are done applying all your textures, you are pretty much finished. You can look at your mesh and decide if it's ready to submit or not. Now this was a basic tutorial, more complicated products will require multiple exports and lots of trial and error usually to get everything just the way you want it. BUt hopefully this tutorial will give you an idea on how to export your mesh and get it into IMVU.
**Note: This tutorial was copied from Neo1471 but edited & added to by me.**
